 FREE SHIPPING FOR USA ORDERS OVER $50


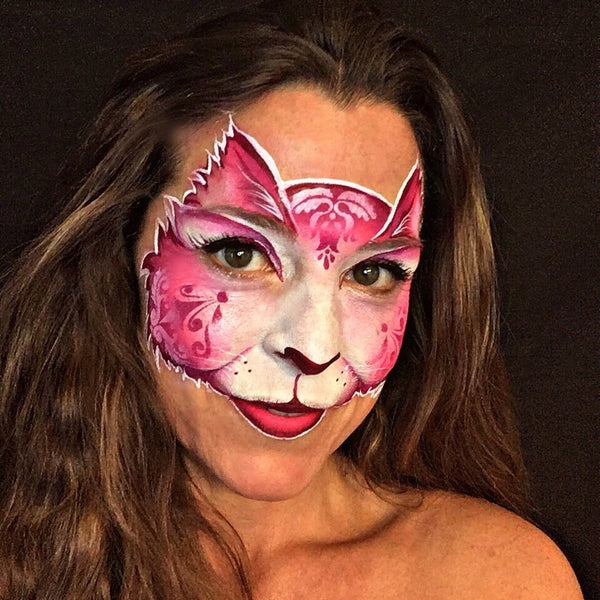
Pink Kitty Cat with Stencil Tutorial
Meow! Kitty Cats are one of my most requested designs on the job. I love changing things up and trying new ideas to keep things interesting! There are so many variations and possibilities when painting a cat, so I thought I would share how incorporating a stencil can add some variety to your cat design.
Materials Used:
Silly Farm Sugar Splash Rainbow Cake
Paint Pal Little Drop Filbert brush
Always Wicked Art Butterfly sponge
Silly Farm Paint Pal Lux Sponge
FAB Wine Berry (formerly Berry Wine)
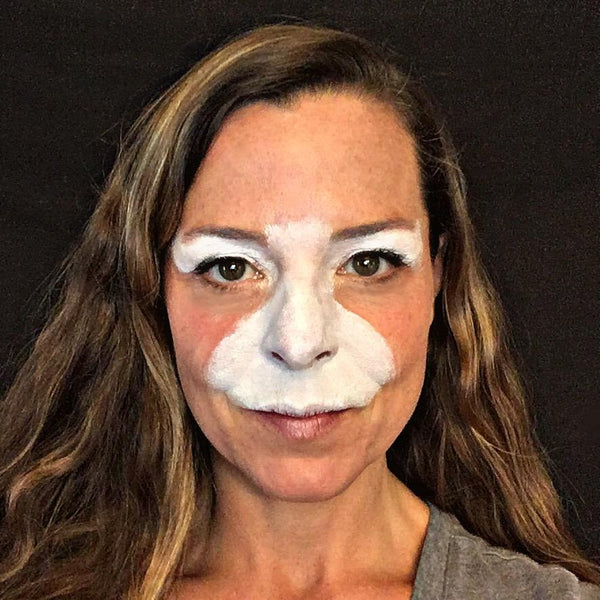
Step 1
Begin by loading a generous amount of Paradise white onto a sponge and creating the cat’s muzzle above the lip. Continue with the white up onto and around the nose, and above the eyes up to the brow line.
Step 2
Now load your favorite rainbow cake onto a petal-shaped sponge, making sure the light color is on the pointed side of the sponge and the dark color is on the larger side of the sponge. Begin applying the paint under the eye and working your way down and onto the cheeks, pressing and moving and blending as you go until you reach the edge of the muzzle area.
Reapply the paint before continuing to the other cheek so the paint is consistent on both sides. Next, apply the paint to the forehead, using the shape of the sponge as your guide. For the ears, rotate the sponge so the dark side of the sponge will create the edge of the ear that is closest to the center of the face, and the lighter side will be the outer part of the ear. Make sure to angle the ears so that they point toward the center of your forehead.

Step 3
Time for stencils! There are so many options at this stage! You could use stencils to add stars or textures or intricate designs. I chose one of my favorite stencils, BAM 2027, which is named, appropriately, Elegance. In order for the stencil to show up on both the dark and the light portions of the cat design, I flipped the sponge so the dark part of the sponge would stamp the stencil’s design onto the light part of the base and vice versa. Be sure your sponge is well loaded, but not too wet, or else it will bleed.

Step 4
Using FAB Berry Wine and a Loew-Cornell #3 round brush, outline your cat, creating wispy lines on the inner portion of the ear, on the outer edges of the ears, and on the side of the face to simulate fur. Add a stretched heart-shaped nose, some small dots on the muzzle, and a line down the middle of the muzzle which widens on the upper lip. Outline the muzzle beginning at the outer edges of the mouth with a thicker curved line and ending with a thin straight line that points toward the outer edges of the nose.
To imitate the shape of cat eyes, I added eyeliner on the top eyelid, eyelashes on the outer edge of the eyes, as well as a sharp diagonal line that begins at the inner corner of the eye and points up and outward, ending at a point and leading back to the outer corner of the eye. Using the hot pink from the rainbow cake, apply some lipstick and outline with plum.
The next step is optional, but adds a softness to the look if you have extra time. Using a Paint Pal Little Drop filbert brush, I moistened it slightly and then dried it off on my towel so it was barely moist and used it to soften my lines, blending the edges and creating some shading. If you’re on the job, you could stop right here, but if you have time, you can continue with the next step.

Step 5
Using a Mark Reid Signature #2 round brush and Diamond FX white, outline your entire design with a thin consistent line. Add some white whiskers on the inner ears and on the muzzle. Outlining the design really makes it pop, in my opinion, though it’s definitely not necessary to have a successful and complete design.
I hope you enjoyed this tutorial, and I can’t wait to see what amazing kitty cats you all will create!
Natalia Malley is the owner and lead artist of Peace Love and Paint LLC in the Washington DC metro area. She has been face painting for about 10 years, has won numerous face painting competitions and has been published in several face and body art magazines including SkinMarkz Magazine, The Colored Palette, QMagazine, FABAIC Magazine and Silly Farm Newsletter.
Facebook: https://www.fb.com/peaceloveandpaintfacepainting
Instagram: https://www.instagram.com/peaceloveandpaint/
Website: http://www.peaceloveandpaint.com


Sandra
March 19, 2018
Very beautiful kitty cat Natalia! Great job! Love to see more tutorials of you on this blog ❤️