 FREE SHIPPING FOR USA ORDERS OVER $50


In this webinar, learn face painting Zoo Animals with Pam Kinneberg.
Design #1: Elephant

I'm gonna start with Bat Hero Blue from Silly Farm. It is one of Susy Amaro's cakes. I have a 3/4" Art Factory flat brush. I'm just loading those colors on my brush, trying to get the majority of that light blue on there. I'm gonna start with the head. I'm gonna do the ear sort of last so that I kind of know where I'm at. The head is sort of flat on top and it comes down. The main part of this is gonna be the trunk so I'm really gonna capitalize on that.
I'm leaving a little space for the tusk. I've got a little sponge here that I can use just to blend it in if there's any areas that need blending.
The next thing I like to do is take some powder. This is Elisa Griffith's powder in Cotton Candy and I like to add a little bit of that where the ear is just to give that more definition and it also adds color which is really nice. And I give a little blush on his face and down the bottom of his trunk.
Now I'm using some Kraze White and I'm just gonna paint in this tusk area.
Now we've got that base, I'm gonna go in and paint my black details on there. I'm gonna start out with the eye that's sort of like an upside down apostrophe. Paint a few little wrinkles. Then I'll work on the ear, kind of give it a little bit more shape. The trunk always has wrinkles too.
And then I wanna add a few water droplets coming out so I'm gonna take my Little Drop Paint Pal brush from Silly Farm and I'm gonna load one side with blue and load the other side with white. You can do water droplets in one fell swoop with that white highlight on the top.
Add some tribal markings to it. I'm using Kraze Black with Blazin Brush #3 Round brush. I think this really gives this elephant some pizzazz and mystique. Just play off of that central swirl. Just something in the background that completes this design.
I'm gonna go in with some highlights so I'm gonna grab some White Kraze paint. I'm gonna put a dot in his eye, make these folds more dimensional, highlight where these little wrinkles are going just to give them more dimension. I'm working with a pretty dry brush because I don't want them to be super opaque. You could just put highlights wherever you felt they needed them.
I'm gonna use Liquid Bling in Fuchsia and I'm gonna put it inside the black areas of the tribal lines and it really pops on those. That really gives some really pretty sparkle to the end of this design. So that's my elephant!
Design #2: Giraffe
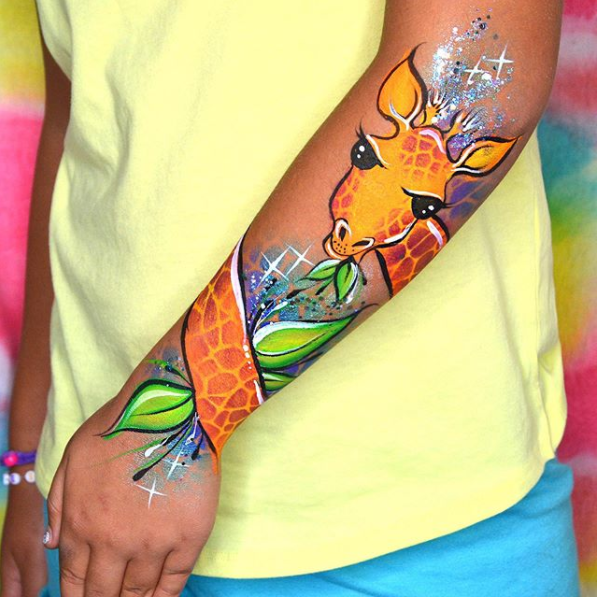
So I'm gonna start out using Sunshine from Leanne's collection and I'm gonna use a 1/2" Flat Blazin Brush by Marcela Bustamante and I'm just gonna pick up the orange and the yellow and this is what I'm gonna create the body and head of the giraffe with. So I start with an upside down "U" for the top of the head and then where the eyes are gonna go, they bulge out a little bit, and then the rest of the face is sort of long and square. Then I'm gonna go and do a couple of big, fun ears. They also have those little horn-like things called "ossicones". Now I'm gonna add the neck. You don't have to go all the way around the arm.
I paint leaves on here too so before I get the rest done, I'm going to paint where my leaves are gonna go in white. He's gonna be eating one too.
I'm gonna take my giraffe print stencils for the background and on the giraffe. These are from BAM Stencils. [Using the bigger giraffe print stencil for the background first and] I'm gonna use Mermaid Pixie Cake. I'm gonna load this color up on my sponge. I don't want it to be super heavy with paint because I don't want it to be super, super dark. So I like to place the purple in the areas that are close to the giraffe so it gives dimension like it's receding. So I start out with the dark colors and then fade off to the light colors.
And then I'm going to use the stencils for the giraffe's body and I'm going to use the color Berry Wine from Superstar. We're gonna use the mini one on the face. I try to start dark and then sort of just fade it off so there's not a hard edge and I just kinda rub it over. Then I take the big one and do the neck with that.
The next thing I'm gonna do is the leaves and I'm using TAG Leaf Yellow for this and I'm just getting my 1/2" brush loaded. I'm just getting a touch of this dark on there, most of it is the yellow and the light green. I'm just painting more cartoon-y type leaves. They're fast and easy. I put a center line up the leaves and I also like to add a few wisps kind of like grass just to give it a few more fun little strokes.
We're gonna be coming in and doing the black line work using the same #3 Round brush with the Kraze Black. I make the ossicones look like little pom poms at the top. The other feature of giraffes is that they have these big doe-y eyes and so those are really fun to put on. You can give them eyelashes too, make it look like a girl giraffe. Try to vary the width of your lines so that it's not all just one solid line.
Let's do some white highlights and glitter and we'll be done. Put some dots in the eyes so that they come to life, some highlights on the ears. Then I put these little twinkly stars too to give it some sparkle. Then I'm using Pisces glitter creme with an applicator and I'm just gonna add some sparkle throughout the design. That's the giraffe right there!
Design #3: Monkey
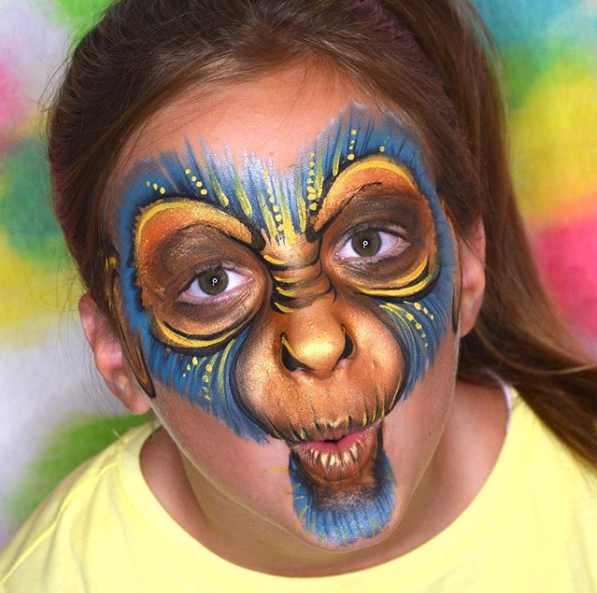
So I'm going to start with Tigress with a 3/4" Flat brush and loading that up and we're gonna create most of the face with this. I'm gonna start with going around the eyes and I'm gonna keep the dark part in the center. Once you have that done, do the muzzle area and chin. On this next part, you're gonna create that dimension with the dark being on the outside. You can take a sponge and just blend this together. And then go right around that bottom lip. Monkeys have big ears so make sure you give 'em some ears.
The next thing I'm going to use is Crash from the Hero Power Palette by Onalee Rivera. That's the one I'm gonna use for the hair Move the brush back and forth to create hair and as it goes around the face, just sort of lean it that direction. When you have the black in there, it gives that dimension right in the center there that's recessed.
I'm going to put some line work. I'll just use black. Monkeys have this sort of thick brow that comes around and goes up. And down the center of their nose, they have these wrinkles so you can put those in. They have these kind of bags under their eyes, sort of some wrinkles there. Some lines around this muzzle, put some nostrils in there. They also have these little wrinkles that come up from the bottom of their mouth. You can do around the ears.
And then, to add a little bit more color again, I'm gonna take some Kraze Yellow and I'm just gonna add my highlights with this. And I always like to add some dots too so I'm just gonna add some dots that go up into the hairline just to add some interest and fun shapes to it. And there you go!
Products Mentioned in the Webinar:
Silly Farm - Bat Hero Blue by Susy Amaro
Art Factory Studio 3/4" Flat Brush
Elisa Griffith Powder - Cotton Candy
Kraze FX - White
Silly Farm Paint Pal Little Drop Filbert Brush
Kraze FX - Black
Blazin Brush #3 Round Brush
Amerikan Body Art Liquid Bling Glitter - Fuchsia Pink
Blazin Brush 1/2" Flat Brush
Fusion Stroke Cake - Leanne's Sunshine
BAM Stencil Scales/Giraffe #3003
Silly Farm Split Cake - Mermaid Pixie
Superstar - Berry Wine
TAG Split Cake - Leaf Yellow
Amerikan Body Art Glitter Creme - Pisces
Silly Farm - Tigress (Natalee Davies Gold Collection)
Fusion Palette - Hero Power by Onalee Rivera
Kraze FX - Yellow
If you missed the live webinar, you can watch it now in the video above or later on our YouTube channel. Thank you, Pam, for sharing your talents with us! Thank you to everyone who tuned in to the webinar. Click here to know our upcoming webinars.


Leave a comment (all fields required)