 FREE SHIPPING FOR USA ORDERS OVER $50


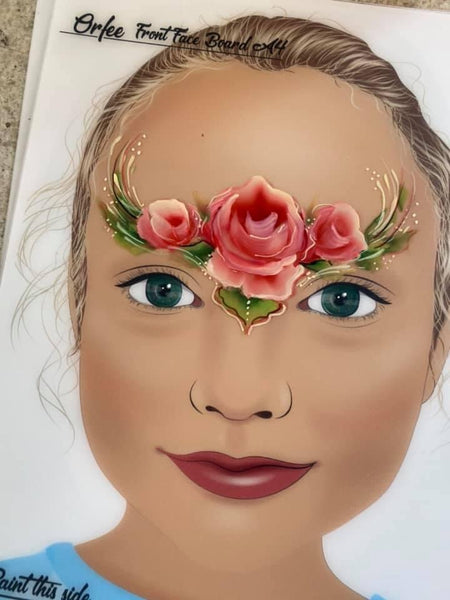
In this webinar, learn different rose styles with Sally-Ann Lynch.
Design #1

Basically, start off with the center rose and it's such a quick rose because you're not doing all the inner petals but it still looks like a nice full rose. We're just going to do a slightly wider "u" shape and you're gonna leave it like that. So it's kind of in between a flower and a rose.
So basically if you look at what I'm doing, I'm just filling up the space on this design and just putting color where you think you want it.
You're kind of dabbing to create that line so we're just using the same brush. And then just have a look at it and see where else you want any of the colors and you might want to introduce a bit more of the green. But this should take probably a minute or so in the real world.
And then you can obviously go in with your detailing if you choose. You could leave it like that. I'm just gonna go in my green and you can just do little embellishments just to make it pop a bit. And just little kicks of color like foliage as if it's coming down by [the side of the] face.
So you can put some little dots in if you want but obviously all these little things will take a little bit extra time but with a design like this, you will have time to do it. Like, you can just highlight some white over the top if you want to.
Design #2
So I'm going in to a nice bright red and white. I'm just gonna do one, two, three, four, five (petals). Do a few buds and then we can go 'round, creating shape. So you're already doing 3 inner buds there. On a little girl's face, you do 3 inner buds because it's a lot quicker as well and there's not enough space.
Here's the leaves coming in. I do it side to side for symmetry. I do everything symmetrical so you keep the balance. It's a bit like a muscle memory exercise. And you're getting this bit of this crown thing going on. I'm just gonna use the very tip end of my brush there to get that little impression that there's a leaf sitting behind there. And then again, it's just down to embellishment. You could either use black but I'm just gonna mix up my black and green so I get a dark green.
I'm just gonna finish off with the nice little leaf under there 'cause it gives it that princessy kind of feel coming down a little bit there. And that's that one! So that's easy.
Design #3

It's going to be a rainbow rose, side rose. Sometimes you would normally come down [the side of the face] but if they're wearing a mask, we need to keep it up a little bit higher.
[When you're switching between colors,] wash the brush out. That's how quick you can do it. So you just give it a squeeze on your towel. Doesn't matter if there's a little bit of color left over, that's what makes it a bit unique and a bit arty, a bit more realistic, a bit more loose in the way you work.
[I will outline my roses] with the dark green. I'm just using a very delicate liner brush. I barely touch the edges because otherwise if you take it too dark, it really, really spoils the softness of the design.
So that's it, really. That's that design.
They're very, very simple and easy and who doesn't love a rose?
Products Mentioned in the Webinar:
Royal & Langnickel 12-Piece Brush Set
Blu Tack
Superstar Petrol Blue
Sally-Ann Lynch Face Painting Practice Board -Charlotte
Sally-Ann Lynch Face Painting Practice Board - Orfee
Sally-Ann Lynch Face Painting Practice Board - Daisy
If you missed the live webinar, you can watch it now in the video above or later on our YouTube channel. Thank you, Sally, for sharing your talents with us! Thank you to everyone who tuned in to the webinar. Click here to know our upcoming webinars.


Leave a comment (all fields required)