 FREE SHIPPING FOR USA ORDERS OVER $50


Have you heard the buzz? Spring is near! And that means it's time to allow ourselves to be inspired by the beauty of nature!
For this design you will need the following supplies:
- A rainbow cake for your base. (The colors I used for my base are a combination of FAB Yellow, FAB White, and FAB Minty Blue)
- Sponges
- BAM Stencil 2006
- Global Dark Blue
- Small angled brush
- Global Leanne's Neon Nirvana
- Diamond FX White
- Diamond FX Black
- Round number 3 brush
- Red Face Paint
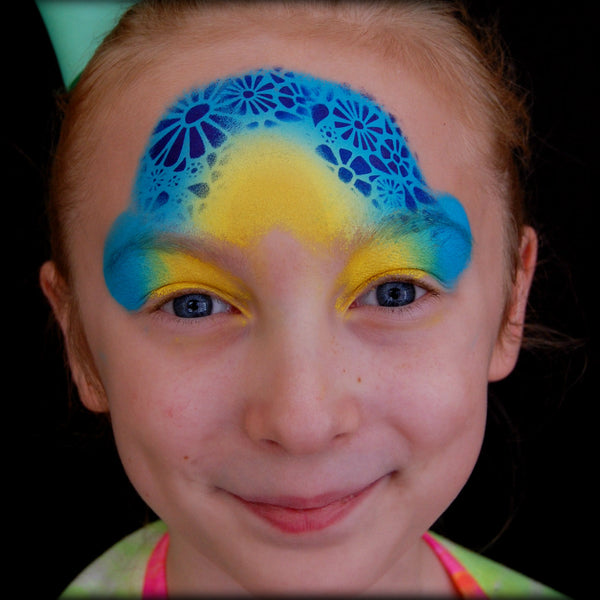
Step 1: Begin by loading a half-circle sponge with a rainbow cake of your choosing. Mine was a homemade cake in the colors FAB Yellow, FAB White, and FAB Minty Blue. Feel free to switch it up by using your favorite colors. This design would also be fun with a more traditional rainbow-colored base! Sponge over the eyes and the forehead in a semi-circle, remembering to keep the lightest color at the inside of the eyes and inner circle.

Step 2: With a sponge or dauber, Global Dark Blue, and BAM Stencil 2006 (Daisies) add some texture and interest on top of your background colors. Try not to go into the yellow, or whichever lighter color you have chosen to use in the inner circle. That is where our bumble bee will go!
Step 3: Paint in your bumble bee in the center of the forehead between the eyebrows. I used the last two colors, neon yellow and neon orange, from Global Leanne's Neon Nirvana and a small angled brush for the head and body. Then rinsed my brush and reloaded with Diamond FX white for the wings. Easy peasy!

Step 4: With a number 3 round and Diamond FX white I knocked out all of my white line work and highlights. I began by going around the eyes then added teardrops where I saw fit in order to frame the design. I kept this design very simple with basic tear drops around the eyes and followed the shape of the base of the design. While my white is already loaded onto my brush I made sure to highlight my bee and add in fun dots down the nose and around the design to fill in any gaps.

Step 5: With a number 3 round brush and Diamond FX black I finished up the line work on this bumble bee design. Very lightly outline around the white teardrops and dots. For the bee itself, I simplified its features by painting a swirl for the head. I don't always feel like a cartoon face is necessary when painting bugs and anytime I can simplify a design yet still get my point across is a win in my book!
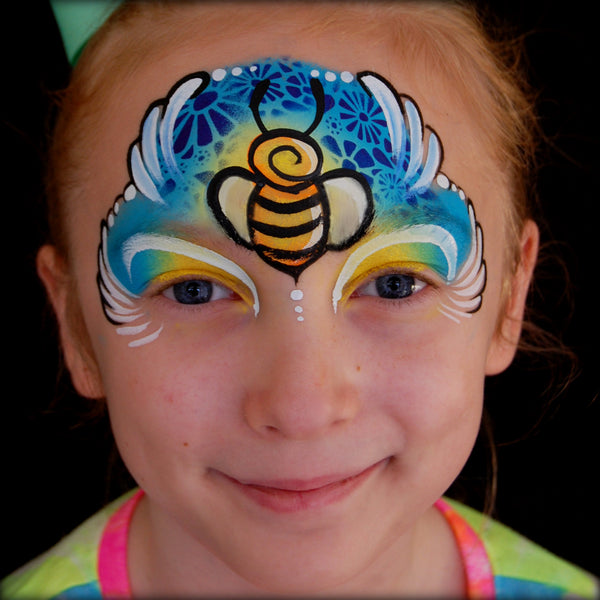
Step 6: The final step is totally optional but for my model it's always a must! Add some red lips, along with bit of blush on the cheeks and voila! A bright and cheerful bumble bee design perfect for springtime!

If you give this look a try I would love for you to share it with me by tagging me on social media and posting in the comments below!
Ashlie Alvey is the owner and artist of Chubby Cheeks Body Art in coastal Savannah, Georgia. You can find her artwork featured in such publications as SkinMarkz Magazine, The Colored Palette, and Wet Paint Magazine. Ashlie is most passionate about creating happy memories for her clientele in the form of birthday party entertainment and one-of-a-kind maternity art. You can follow her on Instagram at www.instagram.com/ashlie_alvey and view her Facebook business page at www.facebook.com/ChubbyCheeksArt.


Leave a comment (all fields required)