 FREE SHIPPING FOR USA ORDERS OVER $50


Skulls are usually a popular boy design.This is the one I use on the job for boys and girls,kids or adults,but the difference is only in the stencils that are used.Often I'm asking client what would they want and show them few stencils.So here we have great skull base that will work for everyone.
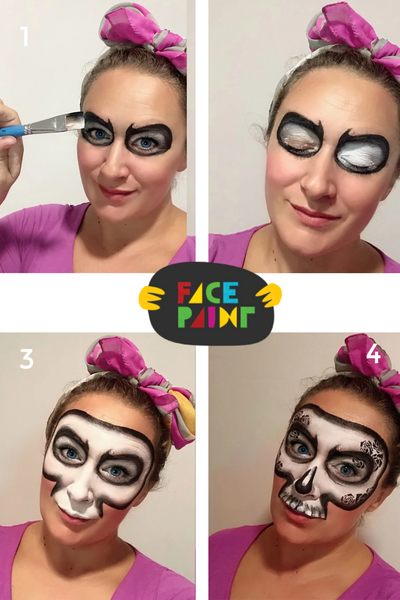
Step 1 : Painting Around Eyes
When I'm painting adults or bigger kids I use split cakes and a 3/4 flat brush,but with smaller kids, I would use round brush No8 and then Mehron starblendwhite or black to fill the area around the eyes.This time I used Kraze FX Split Cake Palette-Shark.

Step 2 : Blending and Filling The Eye Area
Having paint on the eyelids often means you will get smudged or uneven layers of color (left side of picture).To prevent that, I use Mehron starblend powder paint to fill that area and blend it all nicely (right side of picture).Kids feel more comfortable with "dry paint" and it won't smudge as fast as water activated paint.

Step 3 : Creating a Skull Shape
With same Kraze FX Split Cake Palette-Shark, I'm creating a basic skull shape and then with Lollipop Swab and powder paint, fill in the gaps and blend our skull.

Step 4 : Painting The Teeth
For teeth I'm using my all time favorite Prima Barton flora brush .Double loading as we would do for flowers is done with Kraze FX white and black.

Step 5 : Adding Details
This is time when we can be creative.Stencils are a great way to make our simple skull design more special and we have so many choices depending on time of and the clients' wishes. I added a roses stencil,so it's a girls' design,when it's for boys, I would add dots or flames or just a swipe of blue split cake above the eyelids.

Supplies:
Tools:


Leave a comment (all fields required)