 FREE SHIPPING FOR USA ORDERS OVER $75


On those days when I don't know what I'd like to face paint, I ask my models what they would like to have painted on them. For one thing, there are only so many fairies and princesses you can paint before it feels like you're going over the edge. For another, this time around, I was looking primarily for boy design ideas. So in this case when I asked, the request was a full face rocket ship, and that's what we did.
Materials
• Light blue face paint (Paradise)
• Pearl light blue face paint (TAG)
• Red face paint (Paradise)
• Red, orange, and yellow split cake (TAG)
• White face paint (Diamond FX or Wolfe)
• Black face paint (Diamond FX or Wolfe)
• Silver face paint (Paradise)
• 1/2-inch flat or filbert brush
• #5 round brush
• Liner brush (or a #2 round brush)
• Sponge
Tutorial
Begin by sponging the negative space around the rocket ship with a combination of Paradise light blue and TAG pearl blue. This is my standard sky background color. I could have used a graduated sky with the top being a darker blue, and in the future I'd probably do that, but the advantage of the light blues are that they are easier to remove, so it was fine for the purposes of a tutorial.

Next, use your 1/2-inch filbert or flat brush to paint white for the body of the rocket. Leave the nose cone blank for now, since that will be red eventually. Make sure the white entirely covers the sides of the nose and try to make your lines as sharp as possible going down over the eyebrows and eyes (not an easy task on an older adult sporting a few wrinkles).
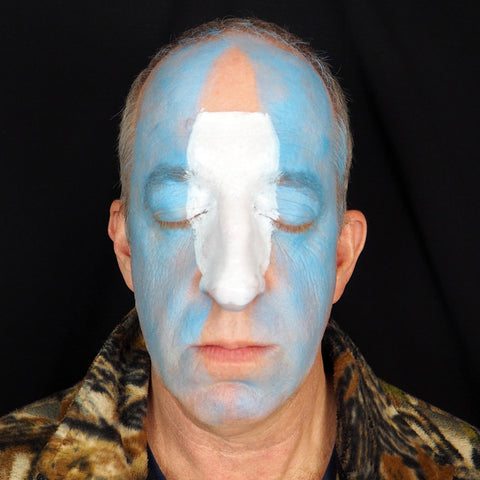
Paint the bottom of the rocket silver with a #5 round brush. The #5 will give you good control in this difficult area.

I'll give you a tip, although I almost always forget to do this. Since I'm right handed, it would have been easier to paint the left red fin first and then try to match it on the other side. I forgot during the tutorial, of course, but it still turned out okay. Also paint the nose cone red.

Before adding the third and center fin, load your 1/2-inch flat from a flame split cake and add flames below the nose going down over the lips. After the flames are finished, carefully paint the red fin right down over the tip of the nose, lining up the bottom of this fin with the other two fins.

I used white and a #5 round to create clouds and add highlights at this stage, but you could do this just as easily with a small filbert.

Finally, outline your rocket with black and a liner. I used a #4 liner, which is still a very slender brush and is similar to a #2 or #3 Loew Cornell Gold Grip in size, so those brushes would work as well for this. You might find the shorter bristle brushes a little easier to control. (The disadvantage is that they don't hold as much paint, so you'll have to load more frequently.)
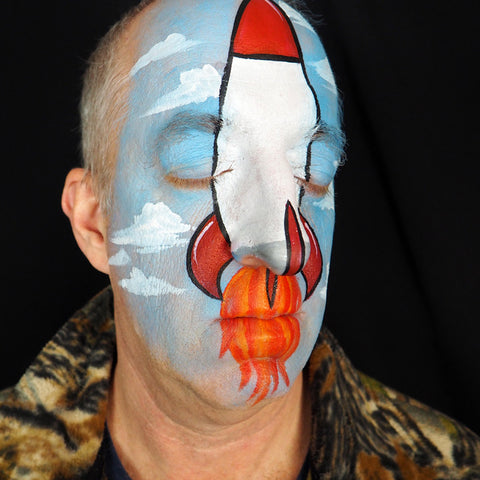
As a very last step if you're into cartoons and have a good sense of humor is to add a bit of character to your rocket ship with some cartoon eyes and a humorous expression. Whether you do this or not is up to you and your model.

Now it's time to take off! Enjoy!
Beth MacKinney is the owner of and primary face painter for Face Paint Pizzazz in Elgin, Illinois, and her artwork has appeared in The Colored Palette and SkinMarkz magazines. She services the western and northwestern Chicago suburbs, Chicago’s north side, and the eastern and southeastern suburbs of Rockford. Stop by Clownantics.com to enjoy more of Beth’s face painting tutorials.


Leave a comment (all fields required)