 FREE SHIPPING FOR USA ORDERS OVER $50


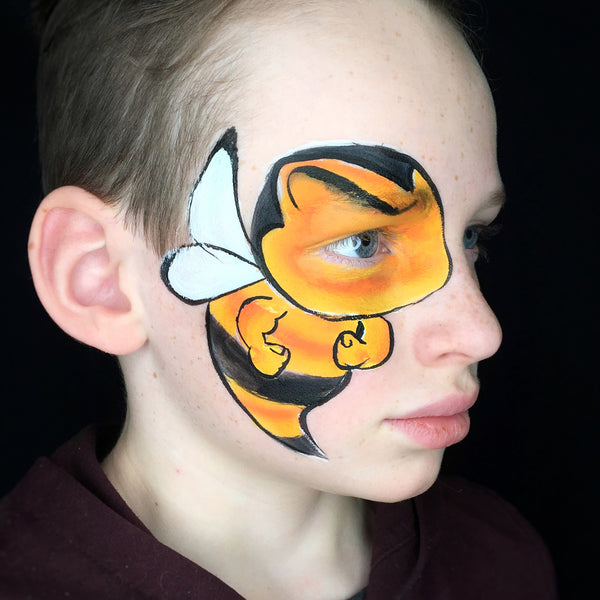
Bumblebees are fast and hard workers and are one of the most effective pollinating insects we have. They pollinate a third of everything we eat and play a vital role in sustaining the planet’s ecosystems. Although this bumblebee here looks like it's up for a bit of trouble, bumblebees, in general, are considered to be peaceful insects who will only sting if they are cornered or if they feel like something is a threat to their hive.
For this specific design I wanted to create a fun and cool boy design, but this can easily be altered into a super cute girl design if you leave out the “angry” eyebrow and add some flowers to the design instead. I hope you like it!
Supplies
Round #3 Brush
Step 1: sketching the design
What I usually do when I paint an eye and cheek design like this, is to paint an outline of the design with white paint. It is a great help when placing a design, as you can then erase the lines and adjust them so that the size and shape will fit your model's facial features.

Step 2: adding the color
For this design, I wanted to use a one stroke to create a bit more depth to my design. I used TAG Flame for this with a small angled brush. Picking up only the yellow and the orange paint from the cake, I filled in the head, body, and arms, keeping the darker area of the brush in the center of the stripes and on the head in order to give the character more of a 3-dimensional feel.
Step 3: filling in the black
For this stage, I filled in the black areas and started on the outlining of the black. I didn't finish all the line work at this stage, because for the next step I knew I wanted to add some stenciled details as well and I didn't want to mess up the black line work with the pattern on top.

Step 4: stencils!
On busy gigs, stencils can be such a life saver and I love how they can make any design transition from basic to fabulous!! One of my absolute favorites is the GraffitiEyes stencils from Lea Selley - it's so versatile and fun! I use the same one stroke from TAG for the stenciled pattern as I used for the main design, picking up the colors with a sponge. Using the right amount of water on your sponge is essential. If it´s too wet your paint will bleed. It's a good idea to test on your arm first to make sure you have the right consistency.
Tip: Learn how to become a real Pro in face painting in How to Become a Professional Face Painter and Get Paid guide.

Step 5: more line work
So after adding the stenciled pattern, I went back to my black DFX and my small round brush to off the rest of the line work. I added a bit of a fur on the body, the texture on the wings and I also went over the design and added some more black outline where I felt it was needed.

Step 6: shading and highlights
This step is optional—on a busy job I rarely have time to add more details at the end than a few white highlights and that's fine. But when I have time to spend an additional minute or two on a design, I do like to add some shading as well. My favorite tool to use for this purpose is my my Cameleon blending brush. I moisten the brush only slightly on a wet wipe or a damp cloth and use the almost dry brush to drag out the paint slightly to create the shading.

Good to know!
When creating any type of design, it is important to pay attention to which focal points you want to use. For this design, I used the center between the eyes and the chin as my main focal points. A good placement is essential in order to make the design work, and small adjustments can make a huge difference in the overall flow of the design. For a design like this, it can also be useful to have the model smile before sketching out the design, so that you avoid essential details will be hidden or distorted when the design is finished.
Kristin Olsson has her background from the art and design world and has been working as a professional face painter since 2016.
She is an instructor at Olga Murasev´s International Face Painting School (www.facebodyart.com), has won numerous face painting competitions and has been published in various face and body painting magazines.
You can see more of her work on her Instagram and Facebook pages.
Want to learn under Kristin's guidance? Take a Class at the International Face Painting School today!


Leave a comment (all fields required)