 FREE SHIPPING FOR USA ORDERS OVER $50


In this webinar, learn Boy Heroes designs with Linnéa Önnerby Novak!
Design #1: Spider-Man

So I'm going to start with using a Natalee Davies 3/4" flat one stroke brush and I'm going to use Pirate Red from Susy Amaro (Silly Farm). I'm going to have the darkest color, black in this case, on the outside and we're going to start right up here almost in the hair and we're going to make some wiggly, wiggly movements so it looks jagged. And now we have a lot of red at the tip so we're just going to fill the space in. You can use a sponge and a single red if you prefer that.
So now I'm using a Loew-Cornell #2 round brush and I've loaded it with a waxy black and we're going to imagine that this face has the Spider-Man mask underneath the skin, then all the lines will be connected to the focal point in the middle, then we're going to connect the lines so it will look like the Spider-Man design.
I'm just going to add some mini cracks. You don't need to do this. On the job, I often skip this part because it looks good anyway but if you get a little bit more time, you can make some tiny details.
Now we are going to put a little spider. You can paint it by hand or you can use Spidey stencils. I'm going to paint it today.
And just to make it a little bit more fun, we're going to add some stars. I love stars. I think it looks cool. I'm using this star stencil from Graffiti Madness.
We're going to add some white for highlights so I'm using a #3 round brush and waxy white paint, and we're going to make some highlights on the web. It really makes the design pop. I'm just adding a little bit of white just to make the skin look a bit raised and I added some highlights on the spider as well. If you want to make it a little bit more fun, you can also add some dots on the design. So there is the first design!
Design #2: Iron Man

I'm taking The Face Painting Shop 3/4" short angled brush, and I'm going to load it with Superstar Carmine Red. So we're going to start with the forehead here and we want this mask to look very symmetrical so we're going to alternate from side to side. Making a line in the middle, and then we're pulling one up towards the hair, and then just fill it in. You can put on your own guidelines just so it looks symmetrical. We're going to make one more line so you can take it from the eyebrow to the hair, same thing on the other side. We're going to make a little bit here on the chin.
I'm picking up Superstar Gold Finch and I'm just going to fill the space (between the red areas) with the gold. I'm using a sponge to blend it in.
I'm going to take a 5/8" brush. Now I'm going to use a single color. I'm loading this one up with silver paint from Superstar. We're going to put that just in the middle and on the other side, and then we will want some half circles.
And now we are moving on to the eyes so Iron Man's got these bright glowing eyes. I'm loading up a petal-shaped sponge with Superstar Ziva Blue and I'm just dabbing this on the eyes.
I'm loading a #3 round brush here with a waxy black to do some line work just to frame the eyes there, outline the silver parts as well.
I'm using a Mini Blending Brush from Cameleon. I'm using a slightly moist wet wipe and just dabbing a little bit on it and then I'm just blending it in a little bit. Blend the lines a little bit and it will look really cool. This step is not necessary but it gives a little bit more shadow, a little bit more depth. If you don't want to use one strokes, you can get the wow effect with a blending brush instead.
And now, the most important step and that is, of course, the highlights. I love using highlights and I also love using stencils. You can add stencils here if you want like small dots or anything but I'm keeping it a little bit simpler this time.
A little cool effect you can do, you can add white on the eyelids and just dab it with your finger and when the boy closes his eyes, it will give a really nice shiny effect. So the Iron Man is done here!
Design #3: Thor
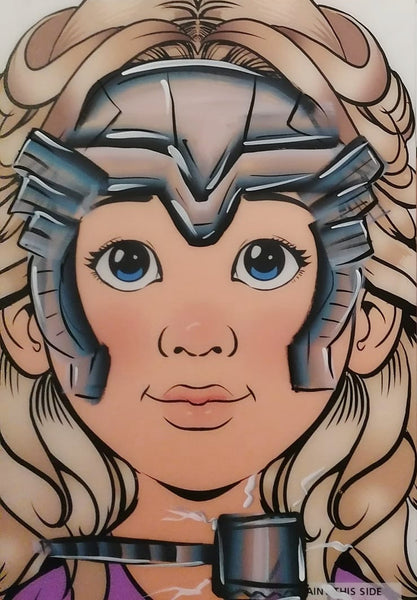
So I'm using Crash from Onalee Rivera's Superhero Palette, and I'm using a 3/4" brush here. This one is short & angled. I want to have the darkest color on the tip of the brush. I'm going to start here in the middle and then we want to take it over the eyebrows. And then we are going to just move it towards the hair. We're going to twist the brush and make the helmet, and we can fill this space in with the tip of the brush. Make the classic Thor wings.
I've already got the brush loaded so I'm going to just show you the hammer (which you can paint on a hand/arm) before I get into the details here because the hammer is super easy.
It's very, very easy just to take some waxy black, outline it, and then some cool highlights. You can also make some lightning bolts coming out.
The lines don't have to be perfect. We're going to grab some waxy white for the highlights. And then this design is done! Super quick, super easy to do and it looks really, really cool.
Design #4: Bumblebee

I'm taking a 5/8" brush and you can use anything that's like metallic silver, gray, or Cameleon Swan. I'm going to start from the eyebrows and we're going towards the hair. And Bumblebee's got 2 squares so we're just going to do this.
Now I'm going to take a yellow one stroke. This one I made for myself. So I'm just going to fill the space and you can use single colors for this, of course. Then I'm using the Ziva Blue and putting that on the eyes.
I've got this really cool Autobot stencil from Diva Stencils. If you're very artistic, you can paint it yourself. So I'm putting it in the middle (of the forehead) here and I'm using a finger sponge with the Superstar Carmine Red.
Now we're going to make some outlines. We're taking the waxy black and our #3 round brush. Go around the eyes and down, make some nice details here and there, some lines. You don't have to make the lines perfect.
We're going to make some highlights, of course, so I'm taking some waxy white. You can also use stencils here, if you want. You can add some dots here and some textures on top of the yellow. So there you've got a Bumblebee design! Of course, you can also add a chin part as well if you want but this is my on-the-job Bumblebee.
Products Mentioned in the Webinar:
Natalee Davies 3/4" Flat One Stroke Brush
Silly Farm Arty Brush Cake - Pirate Red
Loew-Cornell #2 Round Brush
Queen Noreen Spider Trio Stencil
The Face Painting Shop 3/4" Short Angled Brush
Superstar Carmine Red
The Face Painting Shop 5/8" Short Angled Brush
Superstar Gold Finch Shimmer
Superstar Mystic Blue Shimmer
Superstar Ziva Blue
Superstar Baby Blue Shimmer
Cameleon Mini Blending Brush
Fusion - Crash by Onalee Rivera
Fusion - Hero Power Palette by Onalee Rivera
Cameleon Swan
Kraze FX Yellow
Diva Stencils - Changing Car Set
Tattoo Pro Wiser's Graffiti Madness Stencil Kit
If you missed the live webinar, you can watch it now in the video above or later on our YouTube channel. Thank you, Linnéa, for sharing your talents with us! Thank you to everyone who tuned in to the webinar. Click here to know our upcoming webinars.


Leave a comment (all fields required)