 FREE SHIPPING FOR USA ORDERS OVER $50


I live in the country and see foxes quite often. I have even had one walk right outside my office window! They are very beautiful animals. I wanted to design a fox that was “Fancy” and worked for a boy or a girl. This design can be altered slightly to work for both!

Step 1: Base
Create the base by using the Tango Rainbow Cake and a sponge. Turn the sponge in multiple directions to keep the colors where I have them in the photograph. Note that the lighter colors are the portions of the face that are in the foreground and would have a highlight, whereas the darker areas are recessed and would be shadowed creating depth in your design. I used a wet wipe to wipe off excess paint on the cheeks to give it a nice curve.

Step 2: Stencils and Muzzle
Now to add the white fur. Rather than just a solid area of white, I chose to use a textured stencil to give it interest. I used the Damask Mirror Face Paint Ooh!Stencil as it sort of has the look of fur and foliage. Load a sponge with white and place the stencil with the rounded edge down and only stencil up to the yellow base. Also stencil this on the forehead to tie it all together. Use a filbert brush and paint the muzzle under the nose. Keep it small and petite like a fox...they have long narrow muzzles. (Yes, I put some eye makeup on myself in this shot)

Step 3: Black Line Work
Now to outline the design. Use #3 Round brush and begin the outline. Be sure to give the ears a sharp point and a little black triangle at the tips. The nose should be petite and triangular. The side tufts of fur come into the outside corner of the eye. Always use facial features to give yourself a “map” to follow. Create a narrow muzzle and give the fox some whiskers. This design goes above the mouth so that the design will stay nice even if the child eats!

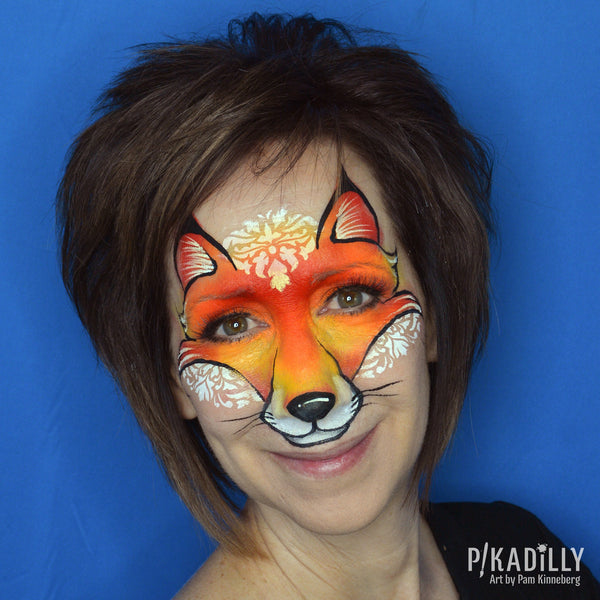
Step 4: White Accents
Add some white wisps of hair inside the ears with a #1 round brush to keep them fine and wispy. Add white teardrops on the sides where the fur is. Don’t forget to add a white highlight on the nose. If you have time, use black powder on the chin to give some shadow area and also add dark red to the inner corners where the orange face meets the muzzle.

Side View

Step 5: Boy Adaptation
This is another idea if you want to make this look more boyish....add a top hat to your fancy foxy! This is quick and easy and super cute!
What does this fox say? It says, “Paint Me!!, Paint Me!!”
Supplies Used:
Tango Rainbow Cake
M01 Damask Mirror Face Paint Ooh!Stencil
Kraze Black Paint
Kraze White Paint
Kraze Red Paint
Loew-Cornell Gold Grip #1 Round Brush
Blazin Brush Round #3
Filbert Brush by Art Factory
MiKim FX Hand-cut Round Sponges (Halved)
Mehren Hydra Foam Sponge

______
Pam Kinneberg is the owner and artist for her business, PiKadilly Face Painting located near Fargo, North Dakota. She has won numerous contests and can be found in various magazines including SkinMarkz Magazine, The Colored Palette, QMagazine, Wet Paint Magazine and SillyFarm Newsletters.
Facebook: http://www.facebook.com/Pikadillyfacepainting
Instagram: @pikadillyfacepainting
Website: http://www.pikadillyfacepainting.com


Leave a comment (all fields required)