 FREE SHIPPING FOR USA ORDERS OVER $75


This bright and bold design features the rich ornate graphic elements of the circus...from the “Big Top” tent to the gold ornate swirls that are reminiscent of vintage circus signage. I love all the imagery that a circus brings to mind! The possibilities are limitless! This asymmetrical design flows around the face in a fun and whimsical fashion. Top off your “Big Top” with a custom made gem, giving it a beautiful sparkling focal point.
Supplies
Global Body Art Liquid Metallic Gold
Global Body Art Rainbow Cake - Kenya
Wolfe Round Sponge (cut in half)
Cameleon Matteo #1 Short Blending Brush (5/16")
Mehron Black StarBlend Cake Makeup
Mama Clown Opaque Poofable Glitter - Gold Rainbow
Ooh! Body Art Stencil #S01
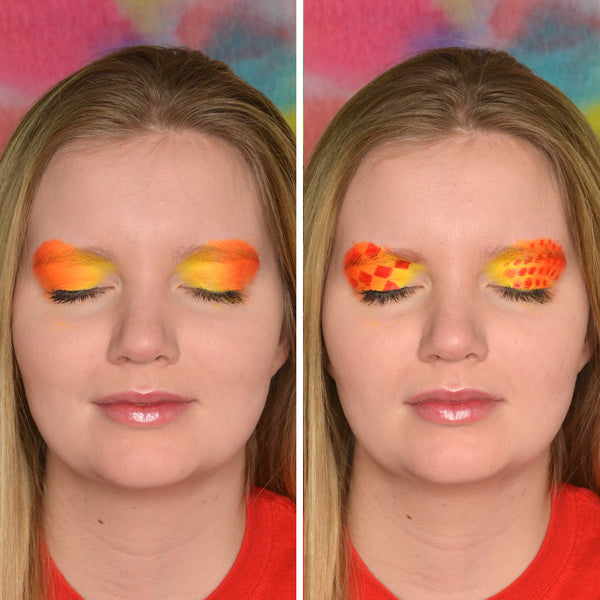
Step one: eyelids
Using the Kenya Rainbow Cake, load a petal sponge. Pounce the sponge on the eyelids until you have achieved a nice blend bringing the color over the top outer edge of the eyebrow (left photo). Once that is done, use two different stencils to create fun patterns on the eyelids. I used BAM #4009 for the diamonds and the BAM Stencil #1218 for the dots using red on a sponge (right photo).
Step two: outline the tent
To ensure your tent ends up where you want it, begin by painting a thin white outline of where it will go. Make your lines curvy and flowing rather that straight and rigid. Put a small dot directly above the pupil so that you know where you are going with your lines so they will all converge at that point.

Step three: stencil work
Before you fill in the tent, do your background stencil work. I LOVE the Ooh! Body Art Stencil that is pictured here. It really works well for a circus theme...it reminds me of a ferris wheel or other fun circus graphics. I used global dark blue for the left side, using only the inner portion of the stencil, (the outer ring would have been too large). On the right side, I just used the small center dot portion of the stencil with green paint to bring that element on the other side for balance. I like to use a Wolfe Round Sponge (cut in half) for this because they are dense and you can pinch the end to get great control where your paint is going over the sponge especially if you want to do just a certain portion of it.

Step four: fill in the tent stripes
Next, fill in the red and white stripes of the tent starting with white first.

Step five: add ornamental gold curls
It is important to have a rich gold in your kit to use for these ornate curls. I found that Global Body Art Liquid Metallic Gold is perfect for this! If you want to add dimension, use brown to paint the recessed edge of the curls as this photo demonstrates.

Step six: shadows and outline
Add some dimension to the tent by using Mehron StarBlend Black pressed powder to the bottom and top edge. I love to use the Cameleon Matteo #1 Short Blending Brush for this. It is a staple in my kit. This gives the tent a bit more of a vintage look. This is optional (left photo). After that, outline your design with black. Do not get too heavy handed on this outline. Try for some nice thick to thin line work (right photo).

Step seven: white swirls and dots
Add the final punch of white to the design with white swirls, dots and highlights. Notice I added a row of white dots above/around the blue stenciled area, and then on the other side, I made the center row of dots, white. Also, I used that same gold paint to add gold dots to the blue stenciled area to bring some gold into that side of the design.

Step eight: lips, glitter and bling
This design is perfect for a nice pair of red lips! Add a little sparkle by applying gold glitter to those red lips. It is magical! Finally, give your design that final sparkly touch with a star shaped gem. These are easy to make and really give this design a beautiful focal point! Apply the gem with Mehron AdGem Acrylic Adhesive.

You will be sure to bring down the house with this whimsical and fun circus design. Have fun with it and rearrange the parts to make your own unique design!
Pam Kinneberg is the owner and artist for her business, PiKadilly Face Painting located near Fargo, North Dakota. She has won numerous contests and can be found in various magazines including SkinMarkz Magazine, The Colored Palette, QMagazine, Wet Paint Magazine and SillyFarm Newsletters.
Facebook: http://www.facebook.com/Pikadillyfacepainting
Instagram: @pikadillyfacepainting
Website: http://www.pikadillyfacepainting.com


Leave a comment (all fields required)