 FREE SHIPPING FOR USA ORDERS OVER $50


I created this design about a year ago, and thought I’d finally share it with you as a tutorial. Kylo Ren established himself as thoroughly villainous in the last Star Wars movie, but there may be a few kids who would like to have a Kylo Ren design in spite of the fact that he’s a bad guy. The advantage of this design is that it’s only a half-face design, so all those moms who have to wash the black off later will thank you for that. (Maybe.)
Materials
• Paradise black
• TAG pearl black
• Paradise silver
• Paradise gray
• TAG pearl light blue
• Paradise red
• Yellow face paint
• Orange face paint
• Diamond FX or Wolfe white
• 1/2-inch flat brush
• #5 round brush
• #1 or #2 round brush
• sponge
Tutorial
Begin by using a small brush and white face paint to make a outline on the face. This is helpful for this design because it helps you identify where you’re going to place your dark colors before you’re committed with them.

Load a flat or filbert brush with a combination of Paradise black and TAG pearl black. I like to mix both of these because together they create a satin finish which is a little shinier than a matte finish but still has a slight gloss to it. Brush this over the forehead, eye, and cheek area as shown in the photo. (If you find it easier to use a sponge for this, you could do that instead.)

Load your brush with silver and grey to fill in the remaining shape. Around the temple, incorporate a little white for that area, which will be a location with more reflection.

By the cheek on the lighter color, blend a very small amount of red into the silver.

Using your round brush, create three lines which split the silver/grey area.

Bring the black lines around the eye, and complete the mask as shown with a few more black lines of medium width. The first few times you practice the mask, you’ll need to use a reference to get these in the correct location, but after practice it will be easier, and you’ll remember where they go.
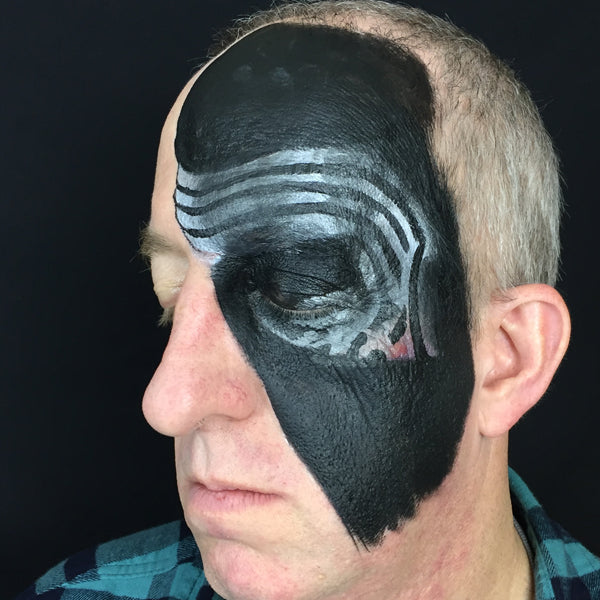
Use a sponge to add a little silver highlight along the front of the mask (by the nose). On the cheek, you can pick up a very small amount of yellow and/or orange with the silver and apply it lightly down the cheek for a highlight. Just like Darth Vader’s mask, Kylo Ren’s has a lot of reflective qualities, and these quick highlights help you create the illusion of a shiny mask.

Use your small round brush to add a few white highlights on the silver portions of the mask. I also added a small starburst on the temple.

On the forehead, again use your sponge with a light amount of TAG pearl sky blue to create some highlights. When I first completed this design, I didn’t add the extra black on the other side of the forehead, but the mask seemed to be an odd shape and to end abruptly without it. So to complete the design, load your flat brush with straight matte black and brush away from the spot between the eyes at a diagonal up toward the other temple. When you’re done and looking straight at the design from the front, it will create a diagonal line that sweeps down from the model’s right temple (your left) down to the left jaw (your right).

Thanks for checking out today’s tutorial, and I hope you’re able to use this Kylo Ren-inspired villain mask for his fans at your events.
Beth MacKinney is the owner of and primary artist for Face Paint Pizzazz in the NW Chicago suburbs. Stop by Clownantics.com to see other face painting tutorials by Beth.
If you’re on Facebook, join the Facepaint.com Challenge Group to showcase your artwork and have a chance to win a store credit for themed contests. To get access to units filled with tutorials, product information, business info, and free downloadable resources, join our Facepaint.com 411 Learning Center on Facebook.


Leave a comment (all fields required)