 FREE SHIPPING FOR USA ORDERS OVER $50


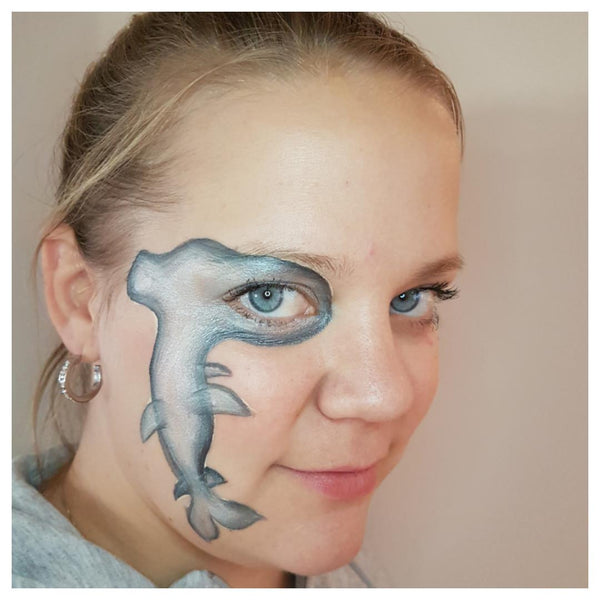
Grumpy Hammerhead Shark
Sharks is a very popular boy design. I usually paint a ordinary shark, but this time I thought it would be fun to do another type of shark. So I decided to do a hammerhead shark! When I looked at photos of hammerhead sharks for inspiration, I found out that they all look so grumpy! Lol! I wanted to do something different from my ordinary shark where I put the jaws around my eye, or using my own mouth as the jaws, so I thought I would try out the "one eye" effect! A little bit tricky, since the hammerhead shark has so wide space between the eyes, but I think it looks funny. :-) I used the one stroke technique for this design, so it can easily be done as a "on the job" design if you skip the background and white outline but at the same time look cool.

Step 1: Sketch
I used a beige colour and a #3 round brush to do a quick sketch for the design. If you have done this several times or if you are sure with your correct placement you can skip this part. I like to do like this if I am not on the job and and have time for it.

Step 2: One stroke head and body
Take a 1/2" angle brush and a black/grey one stroke colour. Make sure to have the darkest colour on the outside and fill in the body and head with the light colour.
Step 3: The fins
Paint the fins using the same one stroke colour and brush. Remember; the hammerhead shark has to small extra fins on the bottom part of the body. You can paint the back fin if you want as well.

Step 4: Outline, highlight and eye.
Paint the other eye on the shark, as long as you can on the other side. I used waxy white, waxy black and a light blue colour, just like my real eye. Outline the shark with waxy black and a #2 round brush. Make the gills and a grumpy mouth. Make a thicker black line on the sharks head. Use a #2 round brush and a waxy white to do highlights, make a little white line just under the mouth, so it looks a little bit like he has a overbite.

Step 5: Background
If you don´t have time you can skip this part, but I think the design looks more complete with a background. Take a half moon sponge and a baby blue colour to paint the background. Use a 1/2" angle brush and a green one stroke to make some seaweed here and there.
Step 6: Bubbles and white outline
To make the design really pop I used a really loaded #3 round brush and waxy white to create a white outline around the whole sharks black outline. Then I made some bubbles in different sizes around the design.
I really hope you liked my grumpy friend! Happy painting!
Products used:
FAB/Superstar "Fair" (sub TAG "Beige")
Cameleon "Swan" (sub Sillyfarm "Shadow")
Sillyfarm Arty Cake "True Leaf"
Tools used:
1/2" Angle brush from Natalee Davies Gold Brush Collection (sub Sillyfarm Paint Pal)
Loew Cornell 795 Round Brush #2, #3
Half moon sponge from Always Wicked
Linnéa lives in the south part of Sweden with her husband and two children.
Linnéa has a small facepainting company in Sweden called Linnéas Ansiktsmålning.
She started to facepaint in 2016, and she is now a certified facepainter from Olga Murasev´s International Face Painting School.
You might have seen her in different facepainting forums or in magazines such as QMagazine and Wet Paint Magazine.
Linnéa really loves everything about this industry, and she likes to challenge herself and keep on growing as an artist.
Follow Linnéa on:
Facebook
Instagram
Youtube


Leave a comment (all fields required)