Frozen 2 will soon be released in theaters around the world and all the girls and even boys will want their faces painted with Frozen 2 characters. Boys often choose the design of the snowman Olaf, but girls tend to choose Elsa, so I decided to make this Frozen 2 mask face paint design.
Hope you like my design!

Step 1
First, make a sketch drawing to properly position the figure of Elsa. The shoulders are between the eyebrows, so that the forehead has enough space for the face and hair.

Step 2
Use a thin round brush and white face paint to paint over the face, neck and hands. White mix in mother-of-pearl turquoise to create color for the sleeves. For Elsa's dress, we'll use turquoise, also adding white color. For the hairstyle, we'll use several shades of blue to give the strands more depth. On the pigtail, we immediately add highlights to make it more voluminous and visually separate from the sleeves.

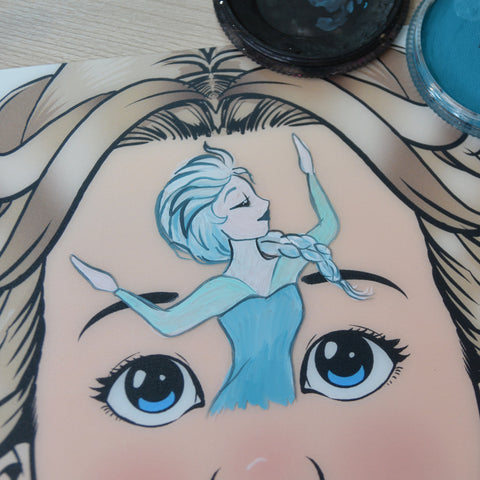
Step 3
The third step is to create the edging of all the details to Elsa' figure to make it stand out and looked brighter. But I did not want to outline this design with a dark black color, so I mixed black with turquoise - we got the right shade.
Step 4
Next, using a sponge and the Mermaid Dreams split cake, create a background on the sides. The dark-blue color should be on the outside, and we'll only use = half of the split cake - we do not need purple colors, only those that resemble frost and cold.

Step 5
Now we will need a few blue shades of color from the tropical palette. Load your brush with the necessary colors and draw patterns resembling butterfly wings. We created a blue arc over Elsa, imitating the magic hand movement in which snowflakes appear.

Step 6
At this stage, you can add snowflakes. This can be done with a stencil or painted by hand, the choice is yours.

Step 7
At the final stage, from the bottom of the mask, we will draw white patterns and melting ice to show that Elsa is the queen of snow. Teardrop-shaped lines will cover the bottom of the dress, so that the figure looks like a full-fledged mask. Fill the empty spaces with white twinkling stars and dots. Decorate with sequins and rhinestones in the form of snowflakes and Pixie Paint. This will give the design a sparkling and bright look!

I hope you enjoyed my step-by-step tutorial, can't wait to see your drawings!
Products Used:
Fusion Body Art Face Paint - Prime Paraffin White
Fusion Body Art Face Paint - Prime Strong Black
Fusion Body Art Face Paint - Prime Deep Teal
Fusion Body Art Face Paint - Pearl Ocean Mist
Fusion Body Art FX Rainbow Cake - Mermaid Dreams
Fusion Body Art Spectrum FX Palette - Leanne's Tropical Collection
Art Factory Studio Brush - Angle (5/8")
Loew Cornell Round No.4 Brush
Loew Cornell Round No.1 Brush
Qosmedix Lollipop Swabs
TAP Face Painting Stencil - Snowflakes
Plastic Face Blings - Snowflakes
American Body Art Pixie Paint "Cupcake Day"
Amerikan Body Art Glitter - Holographic White

My name is Natalia, I live and work in Russia, the city of Yaroslavl. I do face painting for 7 years. One of my favorite destinations - belly painting, (so great to see how kids who have recently been in the tummy are already beginning to walk, talk and learn to draw) in my collection of 40 drawings for pregnant women. I've won a lot of face painting contests and now I want to teach you how to create beautiful drawings on faces. The most beautiful thing when you show your child the finished picture to see his shining smile.
My Instagram page, https://www.instagram.com/natali_faceart/. and facebook https://www.facebook.com/nata.vfr where you can find all the work. Also, please subscribe to my Youtube channel!


