 FREE SHIPPING FOR USA ORDERS OVER $50


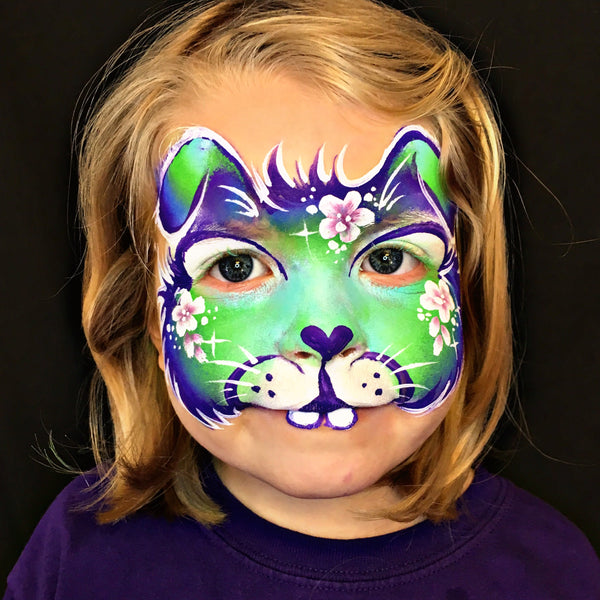
This adorable Easter Bunny face paint design is sure to make everyone say "Awwwww!"
Products Used:
Silly Farm Dragon Pixie Rainbow Cake
FAB Wine Berry (formerly Berry Wine)
Step 1

Using a petal sponge loaded well with Diamond FX White, create the shape of a wide bunny muzzle. Then apply White above the eyes using the shape of the petal sponge as a guide and making sure to line up the corner of the sponge to the corner of the eyes.
Step 2

Using another petal sponge, load the rainbow cake well with the light color on the narrow, pointed edge of the sponge and the dark color on the outer, wider edge of the sponge. Fill in the cheeks with the loaded sponge, creating round chubby bunny cheeks from the edge of the eyes to the edge of the muzzle you already painted. Using only the light colors on the sponge, fill in the center of the design and area on and above the nose. Flip the sponge over to create the forehead, always making sure to point the light colors towards the center of the face and the dark colors on the outside to frame the design.
Reload your sponge when necessary to make sure the colors are always opaque and applied evenly throughout your design. Create the ears by pinching the sponge to make it more narrow and create the shape of a floppy bunny ear. You will want the dark color to create a "shadow" below the flopped ear, and the light color to be at the top of the ear shape. If they child's forehead has enough room, you could make one ear standing up and one flopping down, or even have both standing up!
Step 3

Using FAB Purple Rain and a Loew Cornell #4 Round Brush, outline the ears and create fluffy fur on the edges of the cheeks and on the bunny's forehead. Frame the eyes, muzzle, and add a heart shaped nose for that extra "awwww" factor. Divide the muzzle by painting a line from the bottom tip of the nose to the center point of the lip and then widening the line on the upper lip.
Step 4
Using a Loew Cornell Flora Brush, load it well with DFX White, wipe off the tip on a towel and double dip with FAB Berry Wine to create flowers on the cheeks and forehead.
With a Loew Cornell #4 Round Brush and DFX White, create bunny teeth by laying the side of the brush onto the lip and rolling it side by side until you get the desired width of the teeth. Use the same brush to outline the whole design, add dots and starbursts around the flowers, create whiskers and add fur in the ears. You can go back and outline the teeth with purple if you want as well.
And that's it! Perfect for Easter or any time of year! Wishing you all a Hoppy Easter!
Natalia Malley is the owner and lead artist of Peace Love and Paint LLC in the Washington DC metro area. She has been face painting for about 10 years, has won numerous face painting competitions and has been published in several face and body art magazines including SkinMarkz Magazine, The Colored Palette, QMagazine, FABAIC Magazine and Silly Farm Newsletter.
Facebook: https://www.fb.com/peaceloveandpaintfacepainting
Instagram: https://www.instagram.com/peaceloveandpaint
Website: http://www.peaceloveandpaint.com


Leave a comment (all fields required)