 FREE SHIPPING FOR USA ORDERS OVER $50


Learn how to face paint Maleficent with this easy to follow step by step tutorial. This Maleficent face paint design is great for an adult party, but can also be tailored to children!
Maleficent is such a fun character to paint. Instead of being the traditional ugly witch, she is quite beautiful and elegant. My interpretation covers half of the face and can be quite easy and quick to do depending on how much time you have. I decided to give her a sparkly bling cluster as it fit so perfectly in the black "V" on her forehead. I think she’d quite like it!
Well, well! Let’s paint!

Step One: The Base
This design uses all pearly/shimmer paints. They give it sort of an enchanted feeling. Start with the green base to map out the overall shape usingSuperstar Star Green Shimmer on a sponge. Once you are satisfied with the shape, add purple shimmer to the shadow areas to create dimension. Then sponge on a few highlights using Pearl Fairy White (cheekbone, center of forehead). Blending as you go with your sponges.

Step Two: Black "V"
Using a small filbert brush, paint the black “V” in the center of the forehead. Try to get it right up into the hairline. Give a slight curve to the sides...they are not perfectly straight.

Step Three: Eyelids
Load a petal sponge with Vanessa Mendoza’s Collection “Mariah” Rainbow Cake. Position it over the eyelid with the green point in the inner corner and tap the color on, bringing it up over the eyebrows to create that exaggerated arch. I also tap the color over the black V to give it some magical color.

Step Four: Texture
I love to add bits of texture here and there using stencils. I thought a spiderweb would be fitting on Maleficent. Use the Spiderweb Sphere Ooh!Stencil along with pearl white and purple to give the cheekbone some interest.

Step Five: Black Brows and Line Work
Now for the fun part...the eyebrows. They are so fun to paint! The colored area you just laid down provides a perfect guide so it is easy to know where to put them and keep them symmetrical. Next paint some black lines under the cheekbone area to finish off the bottom edge and bring the lines up toward the center focal point.

Step Six: Cracks
Using a #1 round brush, add cracks to the outer edge of the center “V”. Then paint highlights in white around the top edges of each section where there would be a directional light source. Also, give some highlights to the black lines.
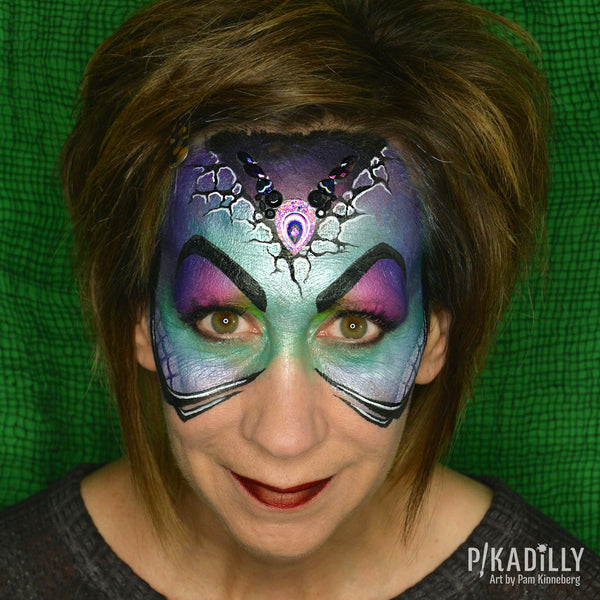
Step Seven: Finishing Touches
Lipstick is an absolute must on Maleficent! Use a dark red and if you want, add a darker color to the outer edges to give it an ombre look. I used Pros-Aide on the back of the bling cluster to adhere it.
A black wig is perfect If this is for a costume party...I put it up to make it look like horns. If you are painting an adult, I would suggest a nice pair of extravagant false eyelashes! Then add a bit of dark eyeshadow to the outer edges of the eyelids and under the lower lashes to really accent the eyes. This is Maleficent after all...she is a bit over the top. Go for it!
Materials Used:
Silly Farm "Maria" Rainbow CakeSuperstar Star Green Shimmer
OR Superstar Peacock Shimmer
TAG Pearl Purple
Fusion Pearl Fairy White
Black Wolfe Face Paint
White Wolfe Face Paint
MiKim FX Hand-cut Round Sponges (Halved)
Always Wicked Petal Sponge
Spiderweb Sphere Ooh!Stencil
Silly Farm Paint Pal Little Drop Filbert Brush
Loew-Cornell Gold Grip #1 Round Brush
Hand Made Bling

-------------------------------------------------------------------------------------------------------
Pam Kinneberg is the owner and artist for her business, PiKadilly Face Painting located near Fargo, North Dakota. She has won numerous contests and can be found in various magazines including SkinMarkz Magazine, The Colored Palette, QMagazine, Wet Paint Magazine and SillyFarm Newsletters.
Facebook: http://www.facebook.com/Pikadillyfacepainting
Instagram: @pikadillyfacepainting
Website: http://www.pikadillyfacepainting.com


Leave a comment (all fields required)