 FREE SHIPPING FOR USA ORDERS OVER $50


Step 1:
Use an angled brush and pearl shimmer teal to lay down the base shape for your eye design. Sprinkle glitter over the base while it is still damp so it will stick.

Step 2:
Use an angled brush and pink and white toned one stroke cake to lay down the base petals for your roses. Be sure to keep the white on the outside edges.

Step 3:
Use the same angled brush to add the center of the roses and inner petals.

Step 4:
Use an angled brush and blue one stroke cake to create leaves between the roses and following the shape of the design.

Step 5:
Load a round brush with white and then reload just the tip of the brush with teal to add double dipped tear drops extending out and down from the roses.
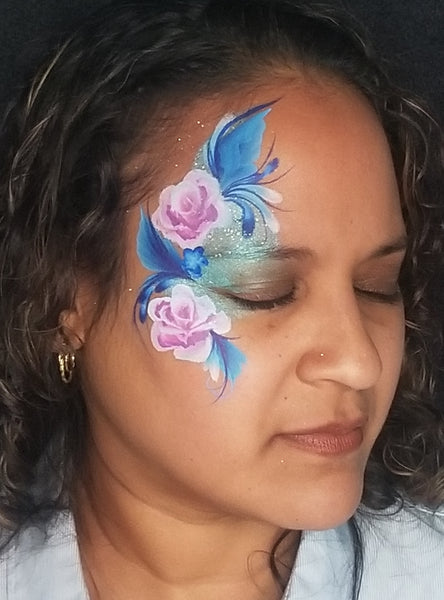
Step 6:
Load a round brush with a dark blue and then reload just the tip of the brush with teal. Create more tear drops coming out and down from the outer corner of the eye and around the top lighter tear drops. Create a small flower at the corner of the eye. Load a small round with just the dark blue and add wispy lines coming from and around the leaves.

Step 7:
Use a small round brush loaded with white and add the veins of the leaves and wispy lines and curls. Use the white to add any highlights to the roses and leaves.

Step 8:
Use a round brush and glitter for final touches. Load a small round brush with yellow and add dots to the centers of the roses. Sponge white from the inner corner of the eye and blending into the outer corner teal. Load a small brush with dark blue and outline the roses and add eyeliner. Lastly, add some festival glitter here and there around the design.
Products Used:
Loew-Cornell Gold Grip Round Brushes - 1, 5 and 3


Leave a comment (all fields required)