
The Christmas season is one of the most magical times of the year for professional face painters, and if we are marketing ourselves properly the other 11 months out of the year, it can also be one of our busiest times!
That's right! Those shopping queues aren't the only lines a mile long, and that means we need to be equipped with quick designs to help us get as many smiles onto faces as we can. However, I am a firm believer that the need for speed doesn't mean we must compromise on quality and visual impact.
Add this Grinch design to your repertoire, and you and your line-waiters will be sure to have a Merry Christmas!
For this design you will need the following products:
- Silly Farm Arty Brush Cake - Bright Leaf
- TAG Light Green Face Paint
- Always Wicked Art Sponge
- Wolfe Black Face Paint
- Wolfe White Face Paint
- Your favorite 1/2' or 5/8" Flat or Angled Brush
- Number 4 Loew Cornell Round Brush

Step 1: Begin by loading your favorite 1/2" or 5/8" flat or angled brush with Silly Farm Arty Brush Cake in Bright Leaf. Choose the size of brush that will best fit the face that you're painting. Keeping the darker green on the outside, paint a pointed upside down letter U beginning above each of the eyebrows. This will eventually be the adorable tuft of hair of Grinch-y hair.

Step 2: With the same brush and one stroke cake, make an arch along both eyebrow areas. There should be no gap between the ends of the tuft of hair and the eyebrows.
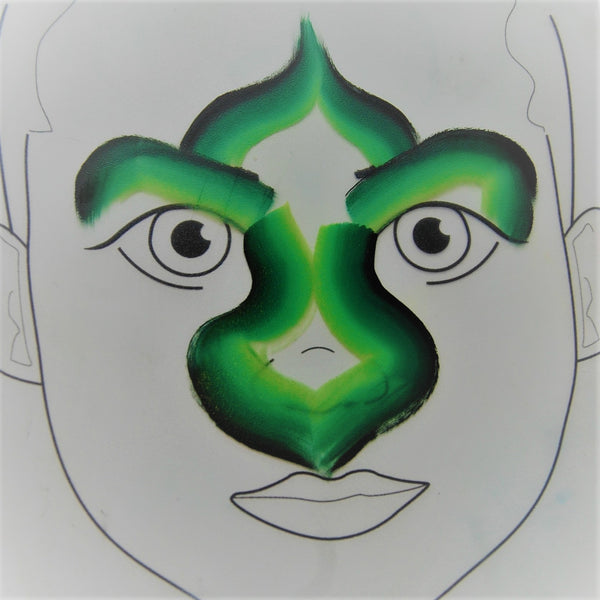
Step 3: Continuing to keep the dark green on the outer edge, paint down the left side of the bridge of the nose. It is best if you can do the nose area in one continuous motion. If doing so gives you a bit of grief, no worries, just be sure to match your colors up and continue swooping down under the nose and back up to the right side bridge of the nose. Keep the end of the design just above the top lip. It's the busy Christmas season and we rarely have time for lip touch-ups!

Step 4: With a sponge and light green face paint, fill in the tuft of hair, eyelid area, down the bridge of the nose and nose area.

Step 5: We're ready to add in our line work with our number 4 round brush. This is your opportunity to tidy up any areas that weren't perfectly defined with the one stroke base. Start with the tuft of hair, then move to those bushy eyebrows. Keep the nose small and just below eye level on the bridge of the nose. This gives you an adorable scrunch-faced baby Grinch feeling. Add a few scowl lines between the eyes for movement and attitude. Finally, finish your black line work with an anchor shape for his mouth. Make sure your anchor doesn't go below the tip of the nose.

Step 6: Time allowing, add white high-lights with a round number 4 brush and Wolfe white. Could you stop at step 5? ABSOLUTELY. It's cute, quick, and impressive and sure to evoke some grins! However, If you have the time to highlight, I suggest you go for it. It really kicks the design up a notch and brings it to life!
For the completed look, pictured below, I also added a few wispy lashes to better suit my sweet model and she absolutely loved it. Don't be afraid to embellish upon it and make it your own to better suit your painting style and to accommodate your customers!

I hope you are able to use this festive face at your upcoming Christmas events!
Ashlie Alvey is the owner and artist of Chubby Cheeks Body Art in coastal Savannah, Georgia. You can find her artwork featured on FabaTV and in such publications as SkinMarkz Magazine, The Colored Palette, and Wet Paint Magazine. Ashlie is most passionate about creating happy memories for her clientele in the form of birthday party entertainment and one-of-a-kind maternity art. You can follow her on Facebook at https://www.facebook.com/chubbycheeksart and on Instagram at https://www.instagram.com/ashlie_alvey


