Kids love to build snowmen, but they also like having them painted on their faces or arms around Christmastime too! Today we'll show you how to paint a snowman face with these 3 easy snowman face paint designs.
These 3 snowman face paint designs are easy to recreate, don't require too many colors, and kids just love them! Keep reading to learn how to paint a cute snowman face!
#1. Red Hat Snowman
This cute snowman face painting can be done on the cheek, arm, or really anywhere on the body! Recreate this step-by-step design, or come up with your own unique snowman!
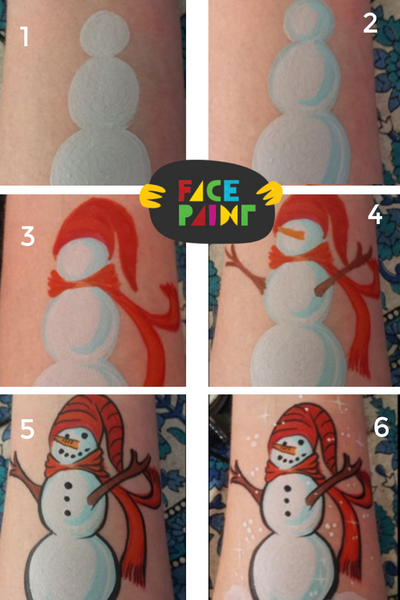
Step-by-Step Guide
Step 1: Start by painting three circles. Start at the bottom and make the biggest, then the middle a little bit smaller, then the head a little bit smaller than the last.

Step 2: Use light blue paint and add some shading on the side of each circle.

Step 3: Using the red and orange, add one a warm hat and scarf. The scarf is easy to get around the neck. just make three short tear drop flicks of a small round brush on each side.

Step 4: Using brown add some branches for arms, and a neon orange nose.

Step 5: Outline the design in black, using the small round brush. Add dots for the mouth and eyes, and buttons.

Step 6: If you have time in the line, then add white dots and starbursts all around the snow man, and give him a little snow underneath.

Products Used:
Medium #4 Round Brush
Small Round #1 (1/16″) Brush
Black Face Paint
White Face Paint
Red Face Paint
Orange Face Paint
Brown Face Paint
#2. How to Paint a Classic Snowman
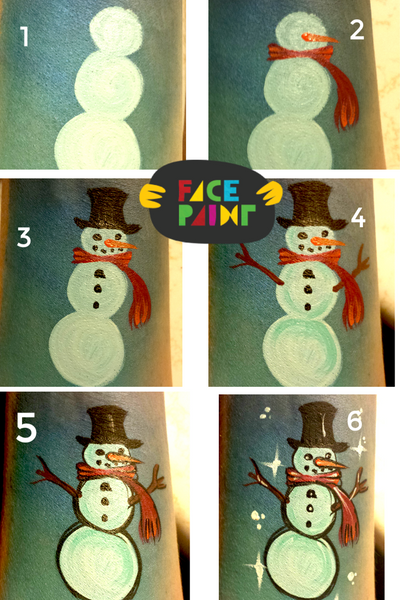
Paint a classic snowman with a black top hat, red scarf, and a big carrot nose! The kids will definitely love this classic snowman, and you don't need too many colors to recreate this look.
Step-by-Step Instructions:
Step 1: Starting with the hydra sponge cut in half, and the Captain Obvious split cake, pounce on the background for where you want your design to go.
Step 2: Next, using the medium round brush, and the white face paint you’ll want to add three round circles that overlap each other, and go from bigger to smaller.
Step 3: Now add the red scarf. Paint three teardrop shapes on each side of the neck. Now paint a long scarf on the side pointing down. Using the same brush, add an orange carrot nose. Add a little orange to the scarf as well for highlights.
Step 4: Next add a top hat, eyes, mouths and buttons using the black paint and round brush to to start to give him life!
Step 5: Now you’ll want to add the sticks for arms, using the brown face paint and the round brush. Draw long, thing lanky lines coming from the middle snowball. Using the light blue, paint shading on the snow, by following the shape of the ball.
Step 6: Using the small round brush outline the design in black.
Step 7: Finally, to finish the design, add white highlights and some dots, and stars. Add glitter to make it sparkle.
Products Used:
Diamond FX Essential Black
Diamond FX Essential White
Wolfe Face Paints – Orange
Wolfe Face Paints Red
Tag Body Art – Brown
Tag Baby Blue – Metallic
Diamond FX Split Cake – Large Captain Obvious 10
Medium #4 Round Brush
Small Round #1 (1/16″) Brush
High Density Hydra Foam Sponge
paper towels or cloth
water container
(optional) Spray bottle with water
(optional) Baby wipes
#3. How to Paint a Cute Snowman Face
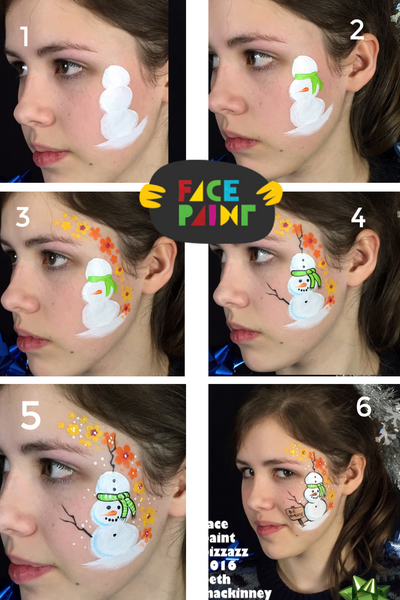
Just when you thought you’d used up every possible snowman variation, you discover the hippie snowman. At least, that’s what I call this design. I chalk it up to reading too much Calvin and Hobbes.
Step-by-Step Instructions:
Step 1: Load your small filbert brush with while and create a standard snowman shape in the snow on the cheek.
Step 2: Using your #5 round brush, add a scarf with TAG light green. Place an orange carrot nose on the snowman, but place it on the center round section rather than on the top.
Step 3: Place your flower stencil on the temple and sponge yellow flowers there and next to the snowman. Load a second sponge or dauber with orange and sponge more flowers around the snowman. Using the smallest flower stencil, place a tiny red flower in the center of several of the large flowers. If you don’t have a flower stencil, use a petal brush to make yellow an orange flowers and give them red dot centers.
Step 4: Use the #5 round brush and light blue to add a lowlight to the bottom edge of each of the snowman segments. Load your #1 or #2 round brush with black and outline the scarf. Also add an eye, mouth, buttons, and arms to the snowman.
Step 5: Load your small round brush with white and place several small stripes on the scarf for detail.
Step 6: Finally, place small snowy dots all around the design with your #2 round brush.
Step 7: The design is complete at this point, but I added one more small detail, just for fun. If you’d like to add the sign, use Paradise light brown to make a rectangle, and mix a little light brown and dark brown for the post. Outline the sign in black with your small round brush and print “BE YOURSELF” on it.
Products Used:
Diamond FX or Wolfe white
Black face paint
TAG light green
TAG orange
TAG yellow
Paradise red
Paradise light blue
Paradise light brown
Paradise dark brown
#1 or #2 round brush
Small filbert brush
#5 round brush
Flower stencil or petal brush
Sponge or dauber
Happy Holidays!
Amy Liza Williams is a face & body artist who resides in the Blue Ridge Mountains of Asheville NC. She is the owner of Asheville face & body Art, a collective of quality artists who work as a team to provide many body art services for the South East region of the United States. We work many local festivals and events, and love traveling and bringing a smile to people’s day. www.ashevillefaceandbodyart.com


